Think about what you want to achieve with the personalization created with Google Optimize. Of course - the personalized website should be even more relevant for specific user groups than the normal website. So ask yourself: Who are your users and what are their interests?
I’d like to show this on a specific example I’m currently working on: www.wuerzburg-fotobox.de
This website was designed to rent out photo booths in Wuerzburg, Germany on a daily basis.
Keyword research tools like Ubersuggest show what people are searching for.
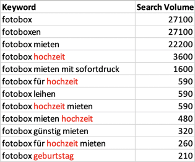
We can see that the vast majority of people is looking for photo booths for weddings (“Hochzeit”), then followed by birthday (“Geburtstag”). Since I’ve seen those photobooths several times on conventions and business events I have attended, we’ll add the third option “Business Event”.
Due to this information, we build three personalized variants besides the default website.
The products are for all three interest groups the same, but we’ve to get their attention individually.
To learn more about the users’ plans for their upcoming events, we could measure time and scroll depths on specific content pages to predict their interests (which is never a 100% proof, even if the user reads the wedding content completely). It is way simpler: just ask them!
For that, the user can click through the step-by-step-guide, which guides to the best-suited product.
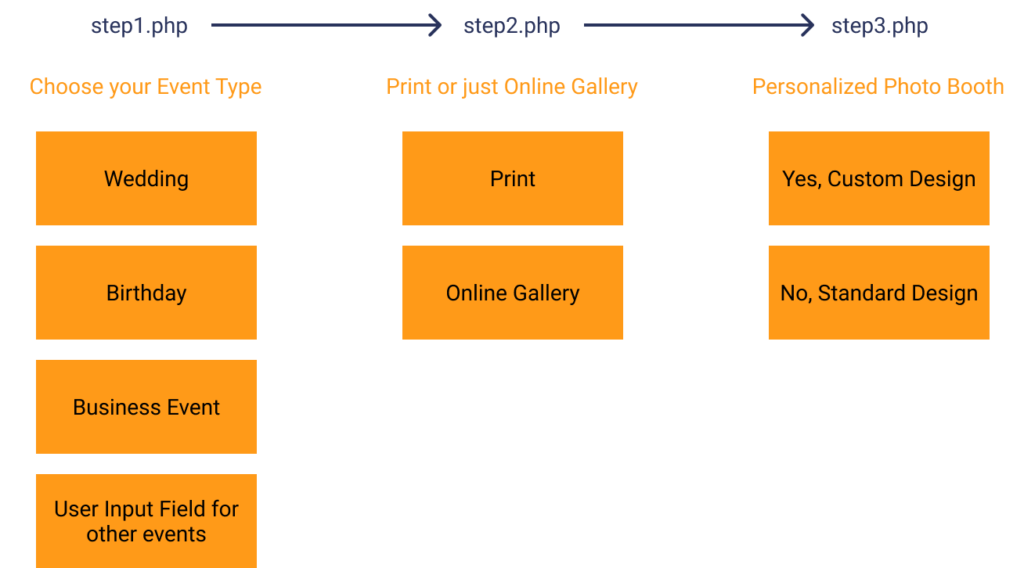
| Step 1 | Step 2 | Step 3 | Product |
|---|---|---|---|
| not important for the product choice, but for the personalization | |||
| Online Gallery | No, Standard Design | Product Package #1 | |
| No, Standard Design | Product Package #2 | ||
| Online Gallery | Yes, Custom Design | Product Package #3 | |
| Yes, Custom Design | Product Package #3 |
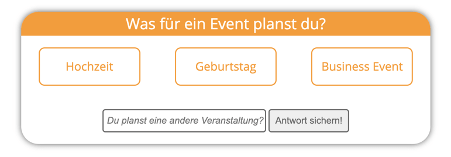
All three buttons on the screenshot above contain the class .event-button.
Add the following JavaScript code on the step-by-step-guide template to save the button content/text to the localStorage when one of the buttons was clicked.
jQuery('.event-button').on('click', function(event){
	$buttontext = jQuery(this).text();
	localStorage.setItem('Step 1', $buttontext);
});
We set the answer of step 1 to the localStorage (similar to cookies) to access it even in future sessions in a few days or even weeks.
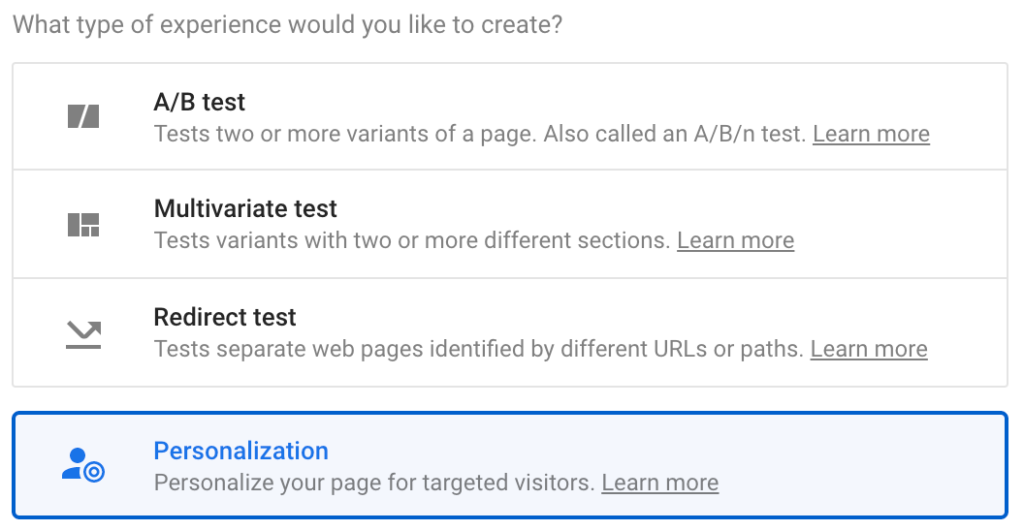
Besides A/B tests, Google Optimize provides the option of showing personalized website variants for different target groups permanently. Depending on the users’ interest or behavior, the website can be displayed slightly differently. The variants tend to fit better for the individual user and they might interact better with the website.
The free version of Google Optimize limits the number of personalizations to ten. Since we plan to do several more personalizations on other pages in the future, we have to do a little workaround. Usually, the easiest way to personalize the website is to use the WYSIWYG editor, where you can edit the content and style directly in the browser. To save personalization experiences in Google Optimize, we have to add some custom code that combines several different variants in only one personalization.
Go to http://optimize.google.com/ and create a new Personalization.
Use the chrome inspector to find the ID of the element you want to personalize.
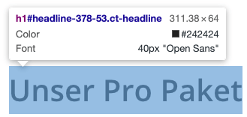
In my case, it is the headline on the product page. Depending on the result from step 1 of the step-by-step-guide, additional text should be appended to the headline.
Example: “Our Pro Package for your wedding” (German: “Unser Pro Paket für deine Hochzeit”)
This headline is available on all product pages and has the same ID #headline-378-53.
Click on Make Site Changes in Google Optimize and create a new variant.
When the editor is loaded, click on the element you want to change. Click Edit Element and Run JavaScript.
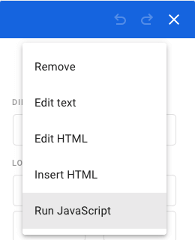
This opens a window to add the JavaScript code, which appends more text to the headline.
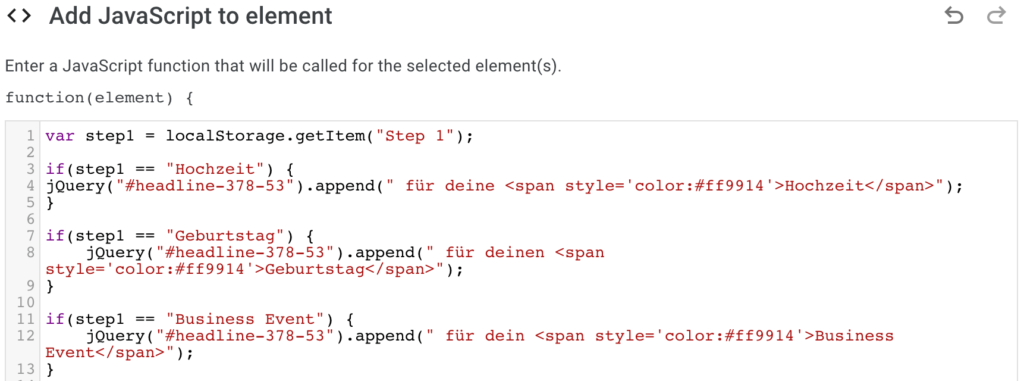
var step1 = localStorage.getItem("Step 1");

if(step1 == "Hochzeit") {
jQuery("#headline-378-53").append(" für deine <span style="color:#ff9914">Hochzeit</span>");
}

if(step1 == "Geburtstag") {
    jQuery("#headline-378-53").append(" für deinen <span style="color:#ff9914">Geburtstag</span>");
}

if(step1 == "Business Event") {
    jQuery("#headline-378-53").append(" für dein <span style="color:#ff9914">Business Event</span>");
}
Depending on the button that was clicked in step 1 (Hochzeit [Wedding], Geburtstag [Birthday] or Business Event), other parts are appended here due to the if-conditions.
It works basically the same for all other items on the page.
To add social proof to the product page depending on the event the user is probably planning, we want to change the “What our clients say about our products and services”-section.
Out of the four client reviews, three should always stay the same: One customer who has rented the photo box for a birthday party, one for a wedding and one for a business event. The fourth review should match the user’s interests and plans for the upcoming event: Change the image and review text to a second bride or groom, birthday child or an additional businessman.

The review section is the same on all product pages, which means the right image has the same id #image-263-53 on all three product pages.
Click again on Edit Element and Run JavaScript to add custom JavaScript.
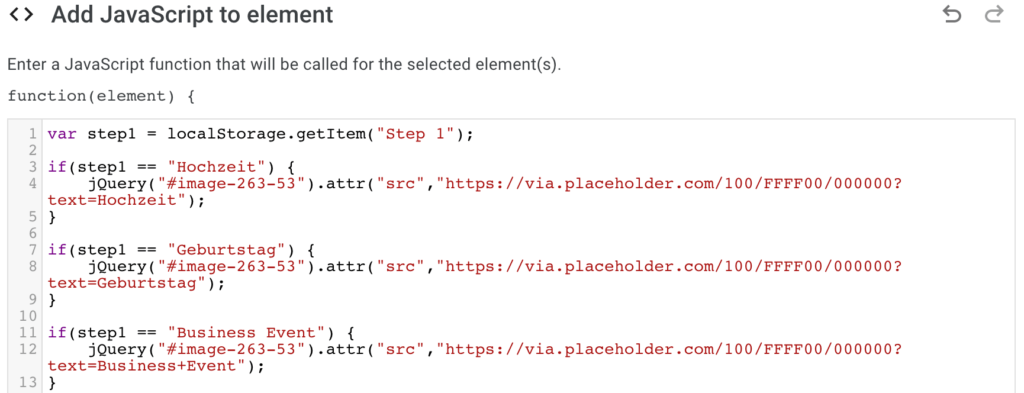
var step1 = localStorage.getItem("Step 1");

if(step1 == "Hochzeit") {
    jQuery("#image-263-53").attr("src","https://via.placeholder.com/100/FFFF00/000000?text=Hochzeit");
}

if(step1 == "Geburtstag") {
    jQuery("#image-263-53").attr("src","https://via.placeholder.com/100/FFFF00/000000?text=Geburtstag");
}

if(step1 == "Business Event") {
    jQuery("#image-263-53").attr("src","https://via.placeholder.com/100/FFFF00/000000?text=Business+Event");
}
.attr changes the <img> source attribute whenever Step 1 is either Hochzeit [Wedding], Geburtstag [Birthday] or Business Event.
Save the changes in Optimize and go back to the dashboard.
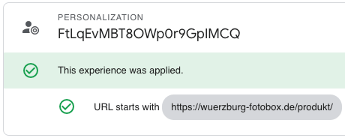
It is important to apply this change to any product page. That is why we have to change the page targeting from URL matches to URL starts with the URL of our product pages.

We want to target all visitors of our website, so we can leave the audience targeting as it is.
Before going live, we have to check if everything works fine. Turn on the debug mode under Site Changes > Preview.
Unfortunately, the experience preview isn’t too revealing and we have to add the key-value pairs to the localStorage manually to see if everything works fine.
Since we have tested all three variants and everything works, we can go live!
Up to now, we do not know how many users get to see which of the different product page variants (i.e. what they are interested in).
To bring light into the darkness, we need the help of Google Tag Manager, which collects the data we can analyze in Google Analytics later on.
Due to our custom code, there is no chance, that Google Optimize sends the variants (wedding, birthday, business event) to Google Analytics as usually.
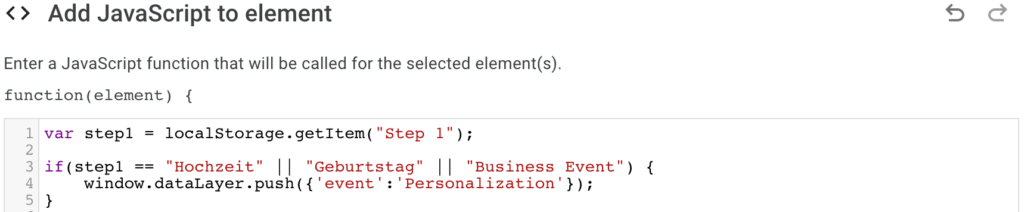
Therefore, we need an extra step. The following code snippet pushes an event to the DataLayer, which triggers a tag in Google Tag Manager.
var step1 = localStorage.getItem("Step 1");

if(step1 == "Hochzeit" || "Geburtstag" || "Business Event") {
    window.dataLayer.push({'event':'Personalization'});
}
Go to your Google Optimize account to edit your page. Pick any element in the Optimize Editor and click edit element to add your JavaScript code.
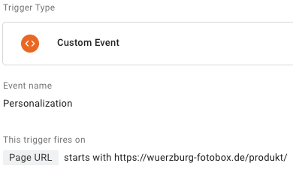
Go to your GTM account and create a new trigger. Choose Custom Event as Trigger Type. The Event Name is the name from above - in our case Personalization.
This trigger should only fire on our product pages. To do so, we set the trigger to fire only on Some Custom Events and set the Page URL to start with the related URL (https://wuerzburg-fotobox.de/produkt/).
Create a new Custom JavaScript variable, which stores the value from the localStorage (we have used the same value in Optimize above).
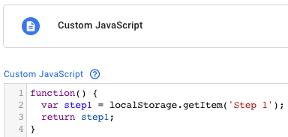
function() {
  var step1 = localStorage.getItem('Step 1');
  return step1;
}
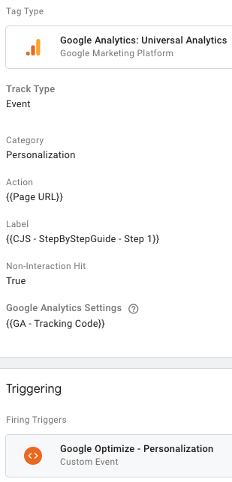
Create a new Google Analytics event tag that gets fired when Optimize pushes the Personalization event into the dataLayer.
Set the Track Type to Event. Name the Category Personalization or any other telling name. The Action tag is the page url, the user is on when the tag gets fired. This is important to analyse later on, which product page (remember the three different product packages from above) the user is on. Last but not least, we have to add the variable {{CJS - StepByStepGuide - Step 1}} we have created before to access the value in the localStorage.
Go to your Google Analytics account to see if everything works fine.
Go to Realtime > Events > Events (Last 30 min) and filter Event Category: Personalization.

Voilà! You have created your first personalization with custom code and everything works!